|
<< Click to Display Table of Contents >> Custom Product Design |
  
|
|
<< Click to Display Table of Contents >> Custom Product Design |
|
Custom Product Design is where you will be able to set the impression size or die plate size of your customizable product. If you are working with a generic product this section will not display because it does not apply.
|
Width: set the width of the impression size (in inches) or die plate here.
Height: set the height of the impression size (in inches) or die plate here.
Max Lines: set the maximum number of lines the customer will be able to customize here. (**when working on daters this field is duplicated. If you would like 2 lines max on your dater (one above the date and one below) set the max number of lines to 1 here**).
Custom Attribute: Choose from the drop down menu to set the custom attribute. The custom attribute is a pre-determined grouping of fonts, font colors, and font sizes that the customer will be able to choose from when customizing the product. We have created default custom attributes that are named to reflect the product. To create a new custom attribute head over to the CPD Config tab.
Stamp Design Wizard Ranking: Choose from the drop down menu to determine the ranking of the product (either: good, better, best, economy, or budget). The Stamp Design Wizard is a unique feature to Stamp Shop Web™ where customers who are not familiar with stamps can design their impression first and then select from mounts you have ranked to choose from. In order for the Stamp Design Wizard to work correctly rank at least a dozen products.
Be sure to click save changes when complete.
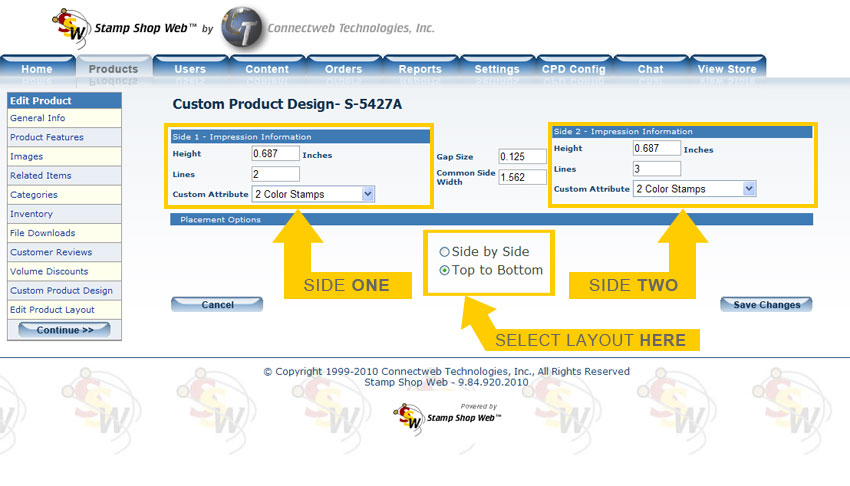
Custom Product Design for 2-Color Customizable Products:
If you are editing a 2-Color Customizable product you will see a difference in the layout of the Custom Product Design page.
|
Side 1 - Impression Information: Within the first column towards the left half of the screen you will need to specify the size, lines, and custom attribute for the first side of the stamp.
Height/Width: if the placement option is set to "Top to Bottom" type the height in inches of the first side of the product. If the placement option is set to "Side by Side" type the width in inches of the first side of the product.
Lines: type the number of lines you would like the customer to be able to customize on the first side of the product.
Custom Attribute: choose from the drop down menu which custom attribute you would like to be applied to the first side of the product.
Gap Size: type the size of the gap between side 1 and side 2 of the product here in inches.
Common Side Width/Common Side Height: if the placement option is set to "Top to Bottom" type the width in inches of the shared side of the product. If the placement option is set to "Side by Side" type the height in inches of the shared side of the product.
Side 2 - Impression Information: Within the second column towards the right half of the screen you will need to specify the size, lines, and custom attribute for the second side of the stamp.
Height/Width: if the placement option is set to "Top to Bottom" type the height in inches of the second side of the product. If the placement option is set to "Side by Side" type the width in inches of the second side of the product.
Lines: type the number of lines you would like the customer to be able to customize on the second side of the product.
Custom Attribute: choose from the drop down menu which custom attribute you would like to be applied to the second side of the product.
Placement Options: choose from either Side by Side or Top to Bottom in regards to the placement of the two sides of the customizable area of the product.
Side by Side: this option will place the 2 sides next to each other in the same row.
Top to Bottom: this option will place the 2 sides on top of each other in the same column.
Be sure to click save changes when complete.