|
<< Click to Display Table of Contents >> Launch Chat Monitor |
  
|
|
<< Click to Display Table of Contents >> Launch Chat Monitor |
|
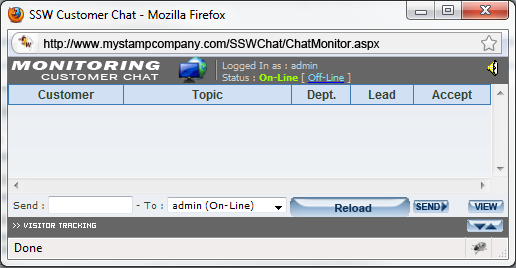
By clicking on the Launch Chat Monitor link a window will popup that will allow you to login and monitor all requests coming from your site.
Customer Chat Monitor
Launches the Customer Chat Monitor and sets your status to on-line.
The Customer Chat Monitor is the tool that your representatives use to accept incoming requests and track your site visitors in real-time or to send instant messages to other representatives. It is a pop-up window which keeps looking for incoming requests and passes them to representatives.
To launch the Customer Chat Monitor, simply click on the “Launch Chat Monitor” link from the left side chat menu within the chat tab of your admin section and a pop-up window will appear. The representative can then minimize this window if desired, and leave it minimized. It will maximize and alert him if an incoming request is received and assigned to him.

The core of the Customer Chat System is the Chat Monitor application which alerts the representatives of new incoming requests that they can attend and lets them track the visitor activity on the site.
To launch the Chat Monitor, the representatives need to log into the system, click the Launch Chat Monitor link within the chat menu and then, they can exit their Stamp Shop Web website and leave the Monitor working.
Customer Chat Interaction
Customer Chat provides face to face interaction by means of a real-time chat between customers and representatives. The chat windows for your customers and representatives provide everything required to have a rich, interactive experience using the system.
The Customer’s Chat
The customer’s chat screen has been specially designed so that your customers can easily and intuitively work with the system and have a pleasant experience when receiving customer support.
When a user requires support, all that he/she has to do is to click on the Support button displayed on your web pages.
If there are representatives On-line, a special form will be shown asking for some preliminary information about the request. This form captures the customer’s information and saves it to the database.
Once the form is submitted, the user will be presented with the chat window where he/she will be connected to a support representative. At this point, the system will assign the user’s request to an on-line representative of the selected department and the representative’s Chat Monitor window will alert the representative of an incoming chat request.
If no representative is on-line, a form will be shown asking for some information to be sent to the department. Once the chat session is finished, the user will have the chance to get a copy of the session transcript by e-mail, get a printable version of the chat, leave a message, or just close the window.
If the Customer Chat System has been configured to ask the customer for feedback on the support session, a window will be shown to the user once he/she closes the chat pop-up, asking for feedback on the chat. This window can also be customized to have custom fields and set a complete customer satisfaction survey.
Representative’s Chat
When a representative is on-line (the MONITORING CUSTOMER CHAT is turned on) and a new request is made by a customer, the Chat Monitor will alert the representative about it so that he can accept the incoming request.
When the Chat Monitor is turned on, the representative can minimize the window and let it work on the background. When a new incoming request is detected, the monitor will alert the representative so that he can attend the request.
Once a request is accepted, the representative’s chat window is displayed. This window has been specially designed to provide your representatives with all the tools required to provide support quickly and easily.
Note: The Chat Monitor requires the representative to click the Off-line link in order to set his status to Off-line and stop assigning him incoming requests. Representatives should click this link before closing the Chat Monitor window.
When a support session begins, the representative has access to the following options:
| • | Transfer Call: Allows the representative to transfer the call to another department or representative by selecting it from the list. The departments listed are those departments that at least have a representative on-line. Next to each department name, is the total number of representatives available for that department. The |
representatives list, displays the current online representatives as well as their availability (their capacity and the number of requests attending). This list can be refreshed at any time by selecting the “Refresh List” option.
| • | Print Button: Allows the representative to get a printable version of the chat transcript. |
| • | Close Button: In order to finish the session, this button must be clicked. |
| • | Chat: Displays the support session. |
| • | Options: Displays the several options available to the representative. |
| • | Request’s Information: Information regarding the customer and the support session. The representative can also get immediate feedback about the session rating and the session time. |
Note: When a call is transferred, the representative that receives the call will be able to review the conversation that the user had with the previous rep only if the option to log chat transcripts have been enabled.
Representative’s Settings:
These are the options accessible to the representatives:
Send Message: Used to write and send messages to the customer. Just type the message in the text box and click the “Say” button.
Send Command: Allows the representative to send a command to the customer. He can select the command and type the message or URL to be used for the command (e.g. ‘Push http://www.stampshopweb.com’).
Canned Reply: Displays the canned replies available to the representative. By selecting a canned reply, the message will be shown to the customer. The load button, will load the automated reply into the representative’s text box, so that it can be modified and customized in the fly during a chat session.
Canned Image: Displays the canned images assigned to the representative. By selecting a canned image, the corresponding graphic file will be displayed in the chat window.
Canned URL: Displays the canned URLs assigned to the representative. By selecting a canned URL the hyperlink will be shown in the chat window.
Canned Push: Displays the predefined Push commands assigned to the representative. By selecting a canned Push, the predefined file or URL will be sent (opened) to the customer.
Canned E-mail: Works exactly as the canned URL but displays e-mail hyperlinks instead.
My Links: Displays all the Quick-links assigned to the representative. Quick Links work as bookmarks which will let the representative easily access your Intranet and web resources (You can set your knowledge base and FAQ systems URLs as Quick-links).
Go to URL: Lets the representative browse the web or your local Intranet by typing the URL address. This URL won’t be displayed to the customer.
Footsteps: Displays the pages that the customer has visited during the chat session.
Other options: Allows the representative to access to other options and reports:
| o | Review : Use it to review the chat session (useful if the call was transferred) |
| o | User : provides several information regarding the customer |
| o | Online : Displays a report of users currently online |
| o | MSGR : Access the instant messenger |
Log Out
Once finished, click the Log Out button to finish your Customer Chat session and you’ll be taken back to the login screen.
If you have launched the Chat Monitor and you click the Log Out button, the Chat Monitor will keep on working and monitoring incoming requests and you’ll still be able to provide On-line support unless you click the Off-line link and close the monitor.