Within the Settings tab set and configure your Customer Chat system. Here you may define several properties required for the Customer Chat system to properly operate.
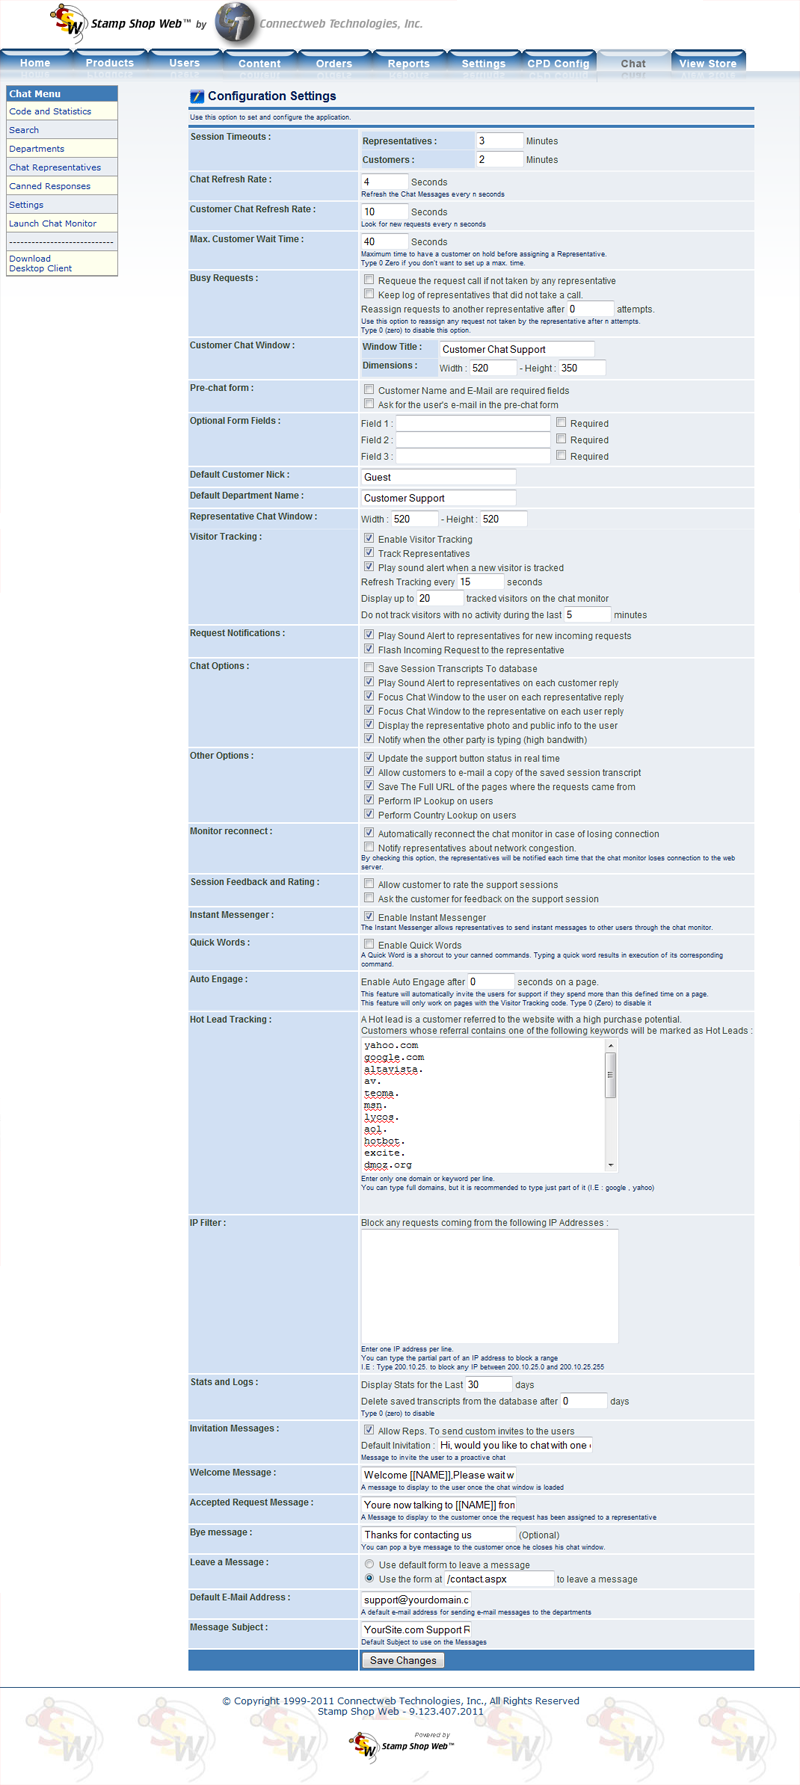
| • | Session Timeouts: You can set how many minutes of inactivity on a chat session should be considered a timeout (e.g. Representatives 4 Minutes, Customers 3 Minutes). |
| • | Chat Refresh Rate: Select the refresh rate in seconds for the messages in the chat (4 to 6 seconds or more is recommended). |
| • | Customer Chat Refresh Rate: Sets the time interval for the Customer Chat to look for new incoming requests (10 to 15 seconds or more is recommended). |
| • | Max. Customer Wait Time: The max number of seconds that a customer might be on hold to be assigned a representative. |
| • | Busy Requests: Use this option to reassign any requests sent to a representative if he/she does not attend it after a number of attempts (MONITORING CUSTOMER CHAT refreshes). This option is useful when a representative is not as his or her desk and a call is received. If the call is not taken or set as busy after this predefined number of attempts, the call will be reassigned and CUSTOMER CHAT will look for the next available operator to take it. You can also set that a call should be queued again if no one accepts it. |
| • | Customer Chat Window: Type the title for the customer’s chat window and enter its default dimensions in pixels. |
| • | Pre-chat form: Set if the user will need to provide his / her name and e-mail address before sending his support request. |
| • | Optional Form Fields: CUSTOMER CHAT lets you collect up to 3 additional information items before the user submits his chat request. You can use these custom fields to collect information related to your business. You could ask for the user’s web site, phone number, address, etc. |
| • | Default Customer Nick: Provide a default nick for your customers. This alias will be used in the proactive chats. |
| • | Default Department Name : Enter a default department name for the proactive chats (e.g. : Customer Support) |
| • | Representative Chat Window: Set the representative’s chat window dimensions in pixels.
|
| • | Visitor Tracking: Use this option if you want to enable visitor tracking on your site. You can also set whether or not to track the system representative’s, if you want a sound alert to play when new visitors are detected browsing the site, the time interval for looking for new visitors, how many visitors should be displayed on the monitor tracking window (type 0 –zero- to display them all) as well as the number of minutes of inactivity for considering a visitor gone and stop tracking it. Please note that CUSTOMER CHAT will be able to track users only on those pages where the visitor tracking code (provided on the start screen) has been pasted. |
| • | Request Notifications: Set if you would like the monitor to play a sound alert as well as to flash the screen to the representative on each incoming request. |
| • | Chat Options: Set the proper options to save the chat session to the database, to play a sound to the representatives each time the customer replies on the chat, to focus the window to the customer or representative on each reply as well as to notify when the other party is typing and if you want to show the representative’s photo to the users. |
| • | Other Options: Lets you select several options such as:
|
| o | Update the Support button in real time: set this option if you’d like your support buttons to refresh automatically every 10 seconds to update their status. |
| o | Allow customers to send by e-mail a copy of the chat session |
| o | Save the complete URLs from where the request came from (checking this option, will include any parameters found in the referring URL). |
| o | Perform IP Lookups to get the user’s ISP host name information |
| o | Perform country lookups to get the customers country location. |
| • | Monitor reconnect: Enable this option if you would like your monitor to reconnect to the system if the connection gets lost. |
| • | Session Feedback and Rating: Set if the users can rate the support sessions and if the system should ask them for feedback on the session. If this last option is selected, when a user finishes the chat, a pop-up window will be shown asking for feedback on the support session. You can also customize this form by adding any number of fields and thus creating a survey to be asked to the user when the chat finishes and he closes the chat window. |
| • | Instant Messenger: Enables the MONITORING CUSTOMER CHAT’s Instant Messenger for sending quick messages among representatives. |
| • | Quick Words: Enables / Disables the use of Quick Words (shortcuts) to trigger your canned commands and automated replies. |
| • | Auto Engage: By enabling the Auto Engage feature, the application will automatically invite the users to a chat after a predefined amount of time on a page. For instance, if you set the Auto Engage to 5 minutes, if a visitor spends more than 5 minutes on a page with the Visitor Tracking code pasted, the application will show him your default Invitation message and invite him to a chat. |
| • | Hot Lead Tracking: CUSTOMER CHAT can identify users with a high purchase potential by checking its referring URL. To do this, the application checks for special keywords or domain names on the users referring URL. For example if a users comes from www.google.com and one of the keywords in the Hot Lead tracking is Google, the user will be marked as a hot lead (any user that comes to your site from a search engine should be considered a hot lead: they were browsing the search engine for a product or service like the one your offer and decided to visit your site). You can also set keywords. If you set as camera as a keyword, any user with this keyword on his referring URL will be marked as a hot lead. A user that comes from http://www.anysite.com/aritlce.asp?o=digital+camera will be set as a hot lead. You should type only one keyword per line on this field. |
| • | IP Filter : Type any IPs or part of them to block any incoming requests coming from those addresses (useful to avoid spamming) |
| • | Stats & Logs: Set the timeframe for the stats and reports (e.g.: last 30 days). You can also set the number of days that the transcripts should be kept in the database before being purged (Type 0 – zero to disable the feature). |
| • | Invitation Messages: Default invitation message to invite the users to a proactive chat, you can also disable this option. |
| • | Welcome Message: A system message to display to the customer in order to welcome him to the chat session. You can use the special keyword [[NAME]] to insert the name of the customer in the message. For example, a welcome message like: ‘Welcome [[NAME]] to the support session.’ will be displayed like: ‘Welcome John to the support session.’ if the customer’s name is John. |
| • | Accepted Request Message: A system message to display to the customer when his request has been accepted and assigned to a representative. |
| • | You can use the special keywords [[NAME]] (which will be replaced with the name of the representative), [[DEPT]] (which will display the representative’s Department) and [[TOPIC]] (which displays the topic entered by the customer). |
| • | Bye Message: If you want, you can display a ‘goodbye’ or ‘thank you’ message to the customer once the session is finished. Otherwise, leave this field blank. |
| • | Leave a Message: Select if you’d like to use the built-in “leave a message” form from CUSTOMER CHAT or type the URL to your own custom form. |
| • | Default E-mail Address: A default e-mail used for sending e-mail from the CUSTOMER CHAT system. |
| • | Message Subject: Default e-mail subject used on the e-mails sent. |
Press the Save Changes button to save the new settings.


